+++ Sons of Horus army list +++
(9 kill points total)
Chaplain - Catap armor
Librarian - Catap armor, force axe
Apothecary - Catap armor, narcethium, power fist
Note that my opponent allowed me run a third HQ and use Pride of the Legion even though I didn't field a Praetor. : )
My Warlord trait makes the Warlord and his retinue cause Fear. The Librarian chooses the Lore of Divination - Prescience, Precognition, Misfortune.
4x Justrearin Terminator
- Power axe, combi-melta
- Power axe
- Pair of lightning claws
- Power fist
Spartan assault tank:
Extra armor, dozer blade, auxiliary drive, ceramite plates, flare shield
Quad lascannon sponsons, twin-linked heavy bolter
5x Legion Terminator - Catap armor
Sergeant - grenade harness, power fist
- Heavy flamer, power axe
- Power axe, combi-melta
- Power axe
- Thunder hammer
- Pair of lightning claws
Land Raider Phobos (dedicated transport):
Extra armor, dozer blade, auxiliary drive, ceramite plates
5x Legion Terminator - Catap armor
Sergeant - grenade harness, power axe
- Heavy flamer, thunder hammer
- Power axe, combi-melta
- Power axe
- Thunder hammer
Land Raider Phobos (dedicated transport):
Extra armor, dozer blade, auxiliary drive, ceramite plates
NOTES
1) Cataphractii armor confers both a 4++ invulnerable save and Slow & Purposeful
2) Auxiliary drive ignores immobilization on a roll of 4+
3) Ceramite plates prevent melta weaponry from rolling 2d6 for armor penetration
4) Flare shield reduces enemy shooting by -1S for ranged weapons and -2S for templates on the front arc
>>-))o> Gundamwing Tau Empire army list >>-))o>
Commander:
Iridium battlesuit, drone controller, target lock, blacksun filter, neuroweb system jammer
2x Marker drone
Fusion blaster, missile pod
The Tau Warlord trait is roll 3d6 for the jetpack assault move.
5x Marker drone (attached to Commander)
Ethereal
Riptide No. 1:
Nova reactor, blacksun filter, stimulant injector, multi-tracker, early warning override, riptide shield generator
Twin-linked smart missile system, ion accelerator
Riptide No. 2:
Nova reactor, blacksun filter, stimulant injector, multi-tracker, early warning override, riptide shield generator
Twin-linked smart missile system, ion accelerator
Riptide No. 3:
Nova reactor, blacksun filter, stimulant injector, multi-tracker, early warning override, riptide shield generator
Twin-linked smart missile system, ion accelerator
Riptide No. 4:
Nova reactor, blacksun filter, stimulant injector, multi-tracker, early warning override
Twin-linked smart missile system, heavy burst cannon
XV88 Broadside Team:
2x Twin-linked rail rifle, twin-linked smart missile system
Blacksun filter, multi-tracker, velocity tracker
1x Twin-linked high yield missile pod, twin-linked smart missile system
Blacksun filter, multi-tracker, velocity tracker
5x Pathfinder
15x Kroot - sniper rounds
Kroot hound
15x Kroot - sniper rounds
Kroot hound
11x Fire Warrior
Shas'ui
11x Fire Warrior
Shas'ui
Hammerhead:
Railgun, submunition rounds, disruption pod
Longstrike
Aegis Defense Line:
Quad gun
MISSION RULES (taken from an upcoming local GT)
KING OF THE HILL
Deployment - Hammer and Anvil
Primary One
King of the Hill - There are three objective markers placed along the mid line of the board (long way). One objective marker is in the center of the table. The other two are 18" on either side. If you control the objective marker in your opponent's deployment zone it's worth 4 battle points. If you control the objective marker in your own table quarter it's worth 2 battle points. The objective marker in the center is worth 3 battle points.
Primary Two
War Zones - Each table quarter you control in your half of the table is worth 1 battle point. Each table quarter you control in your opponent's half of the table is worth 2 battle points. You must have the most scoring units wholly within a table quarter to control it. Dedicated transports don't count and squads must be disembarked.
1st Tie Breaker
If at the end of the game there is a draw on total battle points then use kill points as the first tie breaker.
2nd Tie Breaker
Whoever destroys the most enemy scoring units wins.
Modified Night Fight is automatic the first turn. Units cannot shoot more than 24". Night vision does not work. Barrage automatically scatters 3d6 if the large blast template is placed beyond 24" range - if you roll a HIT then use the small arrow to determine the direction of the scatter.
No battle points for First Blood, Slay the Warlord, or Line Breaker.
There are six turns and then a seventh on a roll of 4+.
Sons of Horus go first.
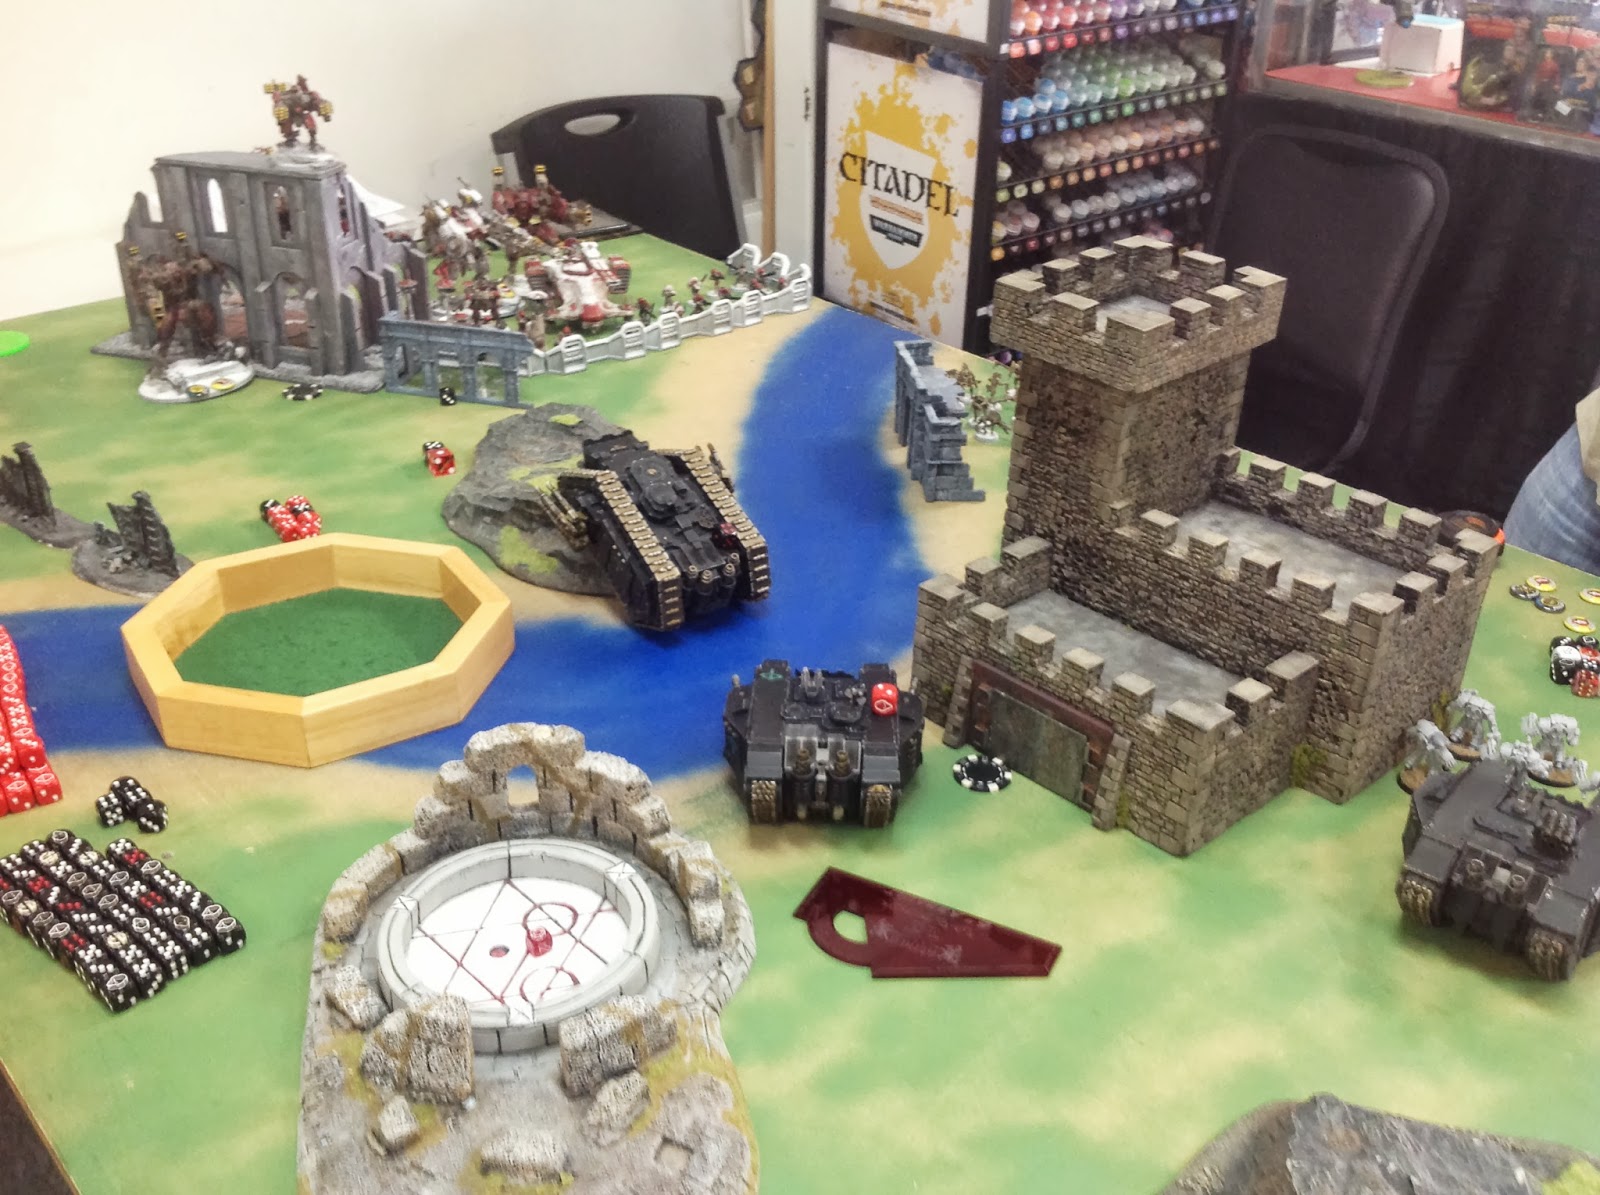
I deploy as follows.
The rear land raider Phobos is deployed behind the battlement completely out of line of sight from the Tau.
Tau deploy aggressively with Gundamwing forward of the Aegis Defense Line on the other side of the stream.
Both squads of Kroot will outflank. Ethereal is joined to one squad of Fire Warriors and is manning the quad gun. Pathfinders infiltrate into a small thicket to my left of their battle formation.
Pre-Game Analysis
17 of Horus' finest versus the upstart Tau... My plan is to sit back the first half of the game, fire lascannons into Riptides (killing them one at a time) and use Machine Spirit to pepper the Pathfinders then Fire Warriors. The rear land raider is dedicated to sweeping any Kroot that get too close and eliminate their scoring threat. The only two real threats to the Spartan are the Hammerhead or should a Riptide feel a bit frisky and attempt to assault it. I will use the Spartan to cut off enemy line of sight and give cover to the middle land raider Phobos since it is much more vulnerable. By turn 4 I will start pushing forward. My strategy is to end the game holding the middle objective while denying my opponent his objective (King of the Hill). The Spartan is big enough it can prevent enemy infantry from claiming the middle objective.
1st Turn - Sons of Horus
No movement. All lascannons in range target the forward most Riptide and drop three wounds. Heavy bolters vaporize the Pathfinders (remember no First Blood).
1st Turn - Tau
The Riptides shuffle a bit then the shooting commences. The middle land raider Phobos loses one hull point to a glancing blow.
2nd Turn - Sons of Horus
The Spartan and middle land raider Phobos both push forward six inches entering the stream. Again lascannons target the wounded Riptide and bring it down. Heavy bolters kill two to three Fire Warriors. The three remaining Riptides are too far back to launch an assault on the Spartan this turn.
Note that the middle objective is on top of the rocky outcrop located in the middle of the table.
2nd Turn - Tau
Neither Kroot squad arrive from reserve. Riptides cautiously move forward a bit; one hops back behind the Aegis Defense Line. The two forward Riptides bring their shields on line. This turn the Tau are unable to inflict any damage to my armor.
3rd Turn - Sons of Horus
The Spartan holds it ground while the middle land raider Phobos moves six inches over to my left so it has line of sight to fire both its lascannons at the next Riptide. Shooting then recommences dropping three wounds on the toward most Riptide. Heavy bolters drop a couple more Fire Warriors.
3rd Turn - Tau
One squad of Kroot arrive and come in on my right side throwing caution to the wind, approaching the battlement located in my deployment zone. Tau shooting then manages to drop one hull point on the Spartan and another on the middle land raider Phobos (losing one of its lascannon sponsons due to a penetrating hit).
4th Turn - Sons of Horus
The Legionnaires to the rear take the bait and go for the newly emerged Kroot. Their transport moves over six inches to my right behind the battlement and the terminators dismount such that they all have line of sight to the Kroot with the heavy flamer positioned up front. The Spartan and middle land raider Phobos form up into a train with the Spartan pulling on top of the rocky outcrop.
Shooting then recommences again with the lascannons dropping the second Riptide and putting one wound on the third. Heavy bolters fail to kill anything. The rearguard then light up the Kroot followed by a successful charge, killing all but three who then break and fall back. The terminators consolidate back partially behind the battlement for some hard cover.
4th Turn - Tau
The second squad of Kroot automatically arrive from reserve also coming in on my right side entering the battlefield at the center of the table - they will attempt to make a play for the middle objective. The remainder of the first Kroot squad continues to fall back. The two remaining Riptides shuffle such that one is just in front of the Aegis Defense Line while the other is just behind it. One Riptide manages to kill one of the rearguard terminators dropping a pie plate on the one out in plain sight. The rest of the Tau shooting is ineffective.
5th Turn - Sons of Horus
There are possibly only two turns remaining so it's time to make a run at the enemy. The warp caster successfully casts both Precognition and Prescience, saving one warp charge to activate his force axe. The rearguard terminators re-embark in their transport which then moves the full 12" plus a flat out towards my objective. The Spartan moves up 6" - the Chaplain, Apothecary and Librarian detach from the Justrearin moving into position to assault the forward Riptide. The Justrearin dismount to my left towards the Commander with its marker drones. The middle land raider Phobos moves 6" to my right and its terminators dismount another 6" in position to multi assault both squads of Kroot.
All shooting target the marker drones and eliminate them all. w00t !!
The three characters take no wounds from Overwatch and manage to bring the Riptide down to its last wound - it does not break. The Justrearin lose one on the way in to Overwatch and just manage to kill the Commander... Note that another Justrearin is fell in melee. The terminators also lose one on the way in to Overwatch, break the big squad of Kroot but the small squad holds.
So very lucky for me that my that two of units are still locked in combat! The Justrearin will have to take it on the chin.
Turn Five - Tau
Tau shooting drops another hull point on the middle land raider Phobos then melee recommences. The two Justrearin lost another brother to a stray shot... Just one left now (note that while not a Troop the Justrearin do count as a scoring unit). The three characters are unable to finish off the Riptide and remained locked in combat. The terminators are unable to finish off the three remaining Kroot and also remain locked in combat.
If I could have won those two combats it would have game over.
Turn Six - Sons of Horus
This could be the last turn... I won't be able to hold the middle objective so I'll have to make a play for my opponent's - there is no way he can reach mine.
The warp caster succesfully casts Misfortune on the Riptide, botches Precognition then gets off his Prescience. The rear land raider Phobos pulls up beside my objective and the four terminators dismount to claim it. The middle land raider Phobos pulls back and turns sideways to screen them. The lone Justrearin moves onto my opponent's objective using what cover is available... He is all alone now. Shooting is concentrated on the rear Riptide and brings it down to its last wound as well. Heavy bolters manage to clip one Fire Warrior from the squad closest to my solo Justrearin.
Yet again the three characters cannot manage to kill the engaged Riptide, even with the aid of Misfortune. The other squad of terminators finally kill off the last of the first Kroot squad but only consolidate 1"... They are out in the open now.
Turn Six - Tau
The squad of Fire Warriors closest to the lone Justrearin move towards him... They will elect not to shoot so they can charge in an attempt to take back their objective. The Ethereal throws caution to wind and joins them. The Broadsides sit still so they can target my terminators out in the open. The Kroot make a move towards the Spartan to go for the middle objective.
The Broadsides polish off the terminators while the unengaged Riptide drops a pie plate on the terminators holding my objective but only manages to clip one and they pass their break test. The Kroot then run towards the middle objective.
The Fire Warriors launch their assault with the Ethereal versus the lone Justrearin - He rides high in the saddle cutting down three, the Tau are unable to bring him down then break along with the Ethereal! Yet again the engaged Riptide makes all its invulnerable saves and survives... Wow that's one heck of a tenacious Riptide.
We then roll to see if there will be a final seventh turn and the game ends. I lift the Spartan and the Kroot are less than an inch away from claiming the middle objective.
VICTORY TO SONS OF HORUS !!!
Post-Game Analysis
The Spartan is truly a beast with the right war gear... Even the mighty guns of the Tau could only just manage to just scratch it's paint. If it had been me I would have dedicated one or even two Riptides to charge it and use the Smash attack.
The first four turns progressed quickly with mostly long range fire power traded back and forth across the battlefield then on the fifth turn things got interesting real quick. Some luck was definitely on my side but not everything went my way. My opponent rolled lots of 1s to hit throughout the game which is one thing markerlights cannot alleviate... Heh !
You never know how things are going to play out over the course of any game but I think overall my initial battle plan was solid. The lone Justaerin was my MVP dishing out the key killing blows and sucking up lots of punishment while my three characters had no impact on the game other than holding up the one Riptide. It was definitely a very exciting game right down to the last roll of the dice. If the Fire Warriors had passed their break check and the Kroot had rolled one more inch to run I would have lost... It was just that close.